
How to Get This Shot – Coyote in the Yellowstone Winter
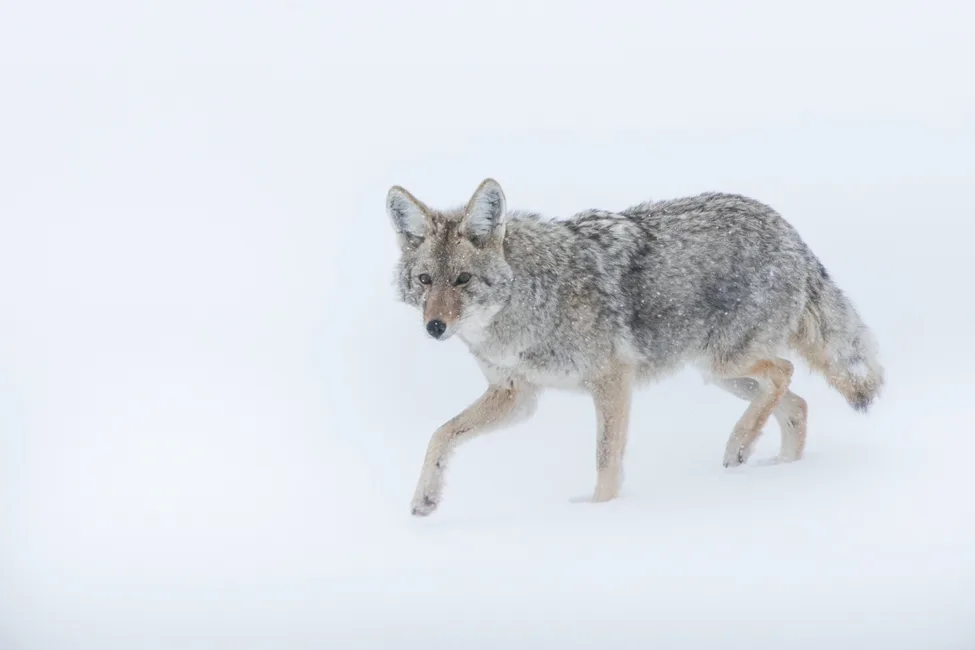
When people think of the big, grand wildlife of Yellowstone in the winter, they usually think of wolves, wolves, and wolves. No doubt wolf watching and photography is amazing in Yellowstone’s winter season (fewer visitors, easier to spot, highly photogenic), people do forget about the other amazing canids in Yellowstone. And amongst those, coyotes can be some of the most often seen and make magnificent photographic subjects.
If you want a shot like this, read on for step-by-step instructions!
First, you’ll need to get yourself to the right place, and simply putting in “Yellowstone National Park” in google maps won’t quite do it :). I of course recommend joining a bona fide photo tour and Natural Habitat Adventures always tops the list for winter wildlife of Yellowstone.
Having expert photo guides around you all day every day removes the need to become an expert wildlife photographer yourself, and instead concentrate on the photos themselves.
So let’s talk about the photo and camera settings.
When nabbing a neat shot like this we have a few considerations. One, is moving wildlife…this instantly presents a challenge for “the right shutter speed” as well as “great composition.” So, let’s talk about those first.
One of the great things about wildlife photography in Yellowstone’s winter is that there is usually quite a bit of light. Although days are shorter, the intensely white snow makes for a decent bit of light. Thus, ensuring shutter speeds of 1/500, 1/750 and perhaps even 1/1000 are reasonable.
These are the speeds needed to “freeze” wildlife as they move, with walking being more of a 1/500 and running being closer to 1/1000. Be prepared to have slightly hire ISOs for 1/1000th of a second speeds (e.g., ISO 1600 and higher, possibly).
For composition, I always try and “zoom out” such that I can take the photo with the animal in the dead middle of the frame, such that there is room on all sides for me to crop in and create that off-center composition (which adheres to the classic rule of thirds, opens in new tab).
Moving on to depth of field, let’s talk about aperture, opens in new tab. Because I usually take the photo zoomed out, this means the animal is a smaller percentage of the camera frame. This allows me to shoot at a shallower depth of field while still ensuring the subject is entirely in focus. It’s safe to use apertures around f/5.6-f/8, which are often necessary to balance out the fast shutter I spoke of earlier.
If you are very close to wildlife and it’s taking up 50% or more of your scene, you may need to look at f/8 and greater (e.g., f/9, or f/11) if you want the entire animal in focus. However, this may not be possible due to the necessary shutter speeds, so when you can’t get the entire animal in focus, make sure that at very least you have the eyes and head in focus…that’s the most important part and what the viewer will look at most.
The final consideration here, which is perhaps most prominent in the photo is the brightness. This is a unique characteristic of winter photography in that you’re often photographing wildlife surrounded by snow.
In order to preserve that brilliant white, I recommend that you overexpose your camera by 1/3 or 2/3s of a stop.
While you may be thinking “Court, isn’t that over-brightening an already bright white scene?” Well, kinda.
Actually, if you are shooting on anything but full manual, your camera will meter for an average amount of brightness across the scene. When you have a preponderance of one lighting schene (lots of white or lots of black) the camera will often make serious adjustments to make the lighting more even.
So, for example, if you have lots of white in your scene, your camera will actually darken the shot because it thinks you will overexpose your shot without the camera’s intervention. The result is gray, dingy-looking snow.
In fact, you DO want to overexpose your shot because you want to preserve the stark whiteness and don’t need any color or texture to a blanket of snow…it’s bright white and the most important thing is to capture that…not the nuances of gray and small ridges present in the fresh snow.
Watch this clip to see the snow settings in action!
So there you have it! Lots of tips on winter wildlife photography in general, but if you are headed to Yellowstone for a winter photo adventure, you are sure to see scenes like this one. And now you’ll be ready to nail the shot, too!
Cheers, and be well,
Court